Referencing robolink
The robolink arms provide reference switches which allow precise and reproducible referencing. This page shows how the referencing is done and how it can be adapted.
- When you switch on the robot for the first time, the software does not know what position the hardware (robot) is in.
The control electronics store the last position of the robot also during power off. However, if the joints are moved by e.g. gravity or manual force when the robot is switched off, then the reference position is no longer valid. Hence, collisions might occur when a program is started. Therefore, although you can always jog the joints manually axis by axis, moving the robot in Cartesian mode or starting a program is only allowed after initial referencing.
Referencing Operation
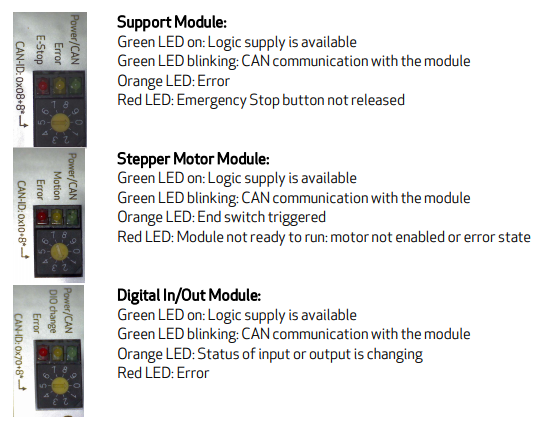
The robot should be jogged manually close to the reference switches, then the referencing is initiated. You will know that the position of an axis is over a reference switch when the yellow LED of the stepper motor electronics module that controls the axis comes on.
When the referencing operation is initiates, in the standard configuration the single joints will then perform a sweep motion with increasing amplitude until it finds the reference switch. Then it performs a slower approach motion from both sides of the reference point to precisely find the center of the reference point.
step-by-step
- Switch on the robot and start CPRog
- Click Connect / Reset / Enable to activate the robot. Now the status light in the left column of CPRog is green.
- Jog the robot arm on the or close to the reference switches using the jog (A1 +/-, A2 +/-,...) buttons at the bottom of the CPRog Window. Indication:
- The orange LED on the stepper module for the axis that you are moving will light up when the reference point is reached.
- In the version with motor encoder the reference switch on the robot lights up in yellow color.
- Open the referencing dialog by pressing on the button "Configuration \ Reference Robot" in the menu accessible via the upper left circle (see image on the right).
- The motors of the joints have to be Enabled to start referencing (see first step)
- Reference the first joint:
- Ensure that the joint can move without collision.
- Press the "Start Referencing Joint 1" button in the dialog
- Wait until the reference motion has completed
- Now the status in front of the button should have changed to "Referenced"
- Proceed with the other joints in the same way. You can also reference several joints at the same time.
- When all joints are referenced, you can close the dialog and proceed to use the robot.
- You will need to "Reset" and "Enable" the robot (just like in step 1) after finishing the referencing operation.

That's it. You're done. The robot is referenced. Now you could e.g. run a program.
Potential Pitfalls
- The joint cannot be jogged to the reference switch due to the joint limit: Set the joint positions to the zero position with the menu button "Configuration / Set Joints to Zero". Then press "Reset" and "Enable" and proceed.
Modifying the reference motion (ADVANCED!)
While the referencing section above is absolutely necessary for a functioning robot, this section is normally not relevant to most people. This changes firmware parameter that are better left untouched, unless you really know what you are doing or are happy to play around with the firmware. Take a screenshot before you start changing anything, in this way you can always put back the original parameters by hand, if the robot starts behaving erratically. The firmware should have been set up correctly for you, if you have ordered the control electronics together with a robot, or if you have told us what robot you are using and we have used that robot before.

The type of reference motion and the parameters can be modified using the ModuleCtrl tool.
The following parameters can be changed:
- Type of reference search motion:
- Straight: Motion in one direction until the reference switch is reached
- Sine: Sweep motion with increasing amplitude until the reference switch is reached
- Half: Used for the "disc version" of a joint. - A joint that has no reference pins but has a half-disc instead. The edge of the half-disc is the reference point.
- None: No reference motion, the module is tagged as "Referenced" directly after start up
- Referencing from both sides: When ticked, the module performs a slow search motion to find the edges on both sides of the reference point. It calculates the center out of these values. This procedure provides higher precision.
- Referencing velocities:
- Referencing speed: used for the search motion. Sign (+/-) defines direction of movement during referencing.
- Ref speed slow: used for the slow search motion from both sides, when ticked. Sign (+/-) defines the direction of movement during referencing.
- Sinus parameters:
- Sinus ref tics: increase of the amplitude in each cycle
- Sinus ref max cycles: how many search cycles are performed
- Offset at end switch: This position is set when the end switch is reached, see Define the zero position offsets.
To change the above parameters, download the ModuleCtrl configuration software.
- Start the ModuleCtrl software.
- Press the "Connect" button
- Choose the module you want to work on: Joint1 = CAN-ID 0x10, Joint2 = CAN-ID 0x20, ...
- There should be a status message with some error messages now.
- Switch to the "Stepper" tab
- Press "Read from Board" to transfer the parameters from the board to the software.
- Change the parameter - !! be careful not to make big changes to the current parameters !! Maybe take a screenshot before you start.
- Press "Write to Board" to save the parameter.
- (Power cycle the robot, if you have changed the encoder direction.)
For questions or comments please get in contact with us: info(at)cpr-robots.com