Difference between revisions of "Template:Connect DCi Robot/TinyCtrl to a Laptop via LAN"
From Wiki
| Line 3: | Line 3: | ||
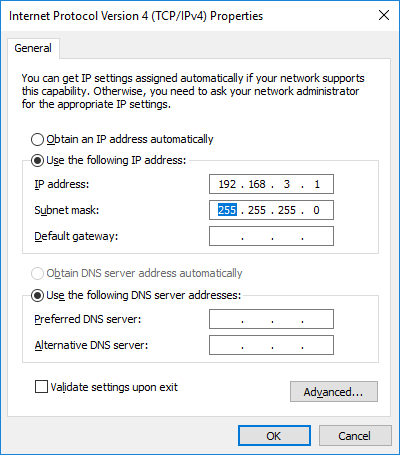
[[file:TinyCtrl_PC_IP.png|PC IP 192.168.3.1, subnet 255.255.255.0]] | [[file:TinyCtrl_PC_IP.png|PC IP 192.168.3.1, subnet 255.255.255.0]] | ||
| − | + | *Power off the robot. Disconnect the power supply from mains power. | |
| − | Plug the LAN cable into the '''right LAN socket at the DCi robot''' and into your Windows computer on the other end. | + | *Plug the LAN cable into the '''right LAN socket at the DCi robot''' and into your Windows computer on the other end. |
| − | |||
*Power on the Robot, disengage emergency stop. | *Power on the Robot, disengage emergency stop. | ||
*Wait until the Green LEDs of the stepper motor boards at the back of the robot start blinking. | *Wait until the Green LEDs of the stepper motor boards at the back of the robot start blinking. | ||
Revision as of 19:27, 5 July 2018
To establish a connection between Linux embedded control (DCi Robot) and PC, the Networkadapter of the PC has to be configured for an IP in the address range 192.168.3.0/24. I usually chose IP address 192.168.3.1 as shown below.
- Power off the robot. Disconnect the power supply from mains power.
- Plug the LAN cable into the right LAN socket at the DCi robot and into your Windows computer on the other end.
- Power on the Robot, disengage emergency stop.
- Wait until the Green LEDs of the stepper motor boards at the back of the robot start blinking.
- Start CPRog and click Connect, reset, enable. The robot should now be ready for referencing, which can be done via the Teach Pendant. However, since CProg is already running, I would now reference the Robot in CPRog (but that's just personal preference).
