PLC Interface
From Wiki
The printable version is no longer supported and may have rendering errors. Please update your browser bookmarks and please use the default browser print function instead.
The most basic way to integrate a robot into a production system is our PLC interface. By sending signals on digital inputs and outputs a PLC can send commands and receive status information. It also allows connecting buttons and lights for a simple display-less control by users.
Video Tutorial https://youtu.be/A5bhbdmGZXU
Available Channels
The inputs execute the following functions on rising edges:
- "Enable": When in error state the errors are first reset. A second rising edge (at least 1s later) will enable the motors (the Fault/NoFault outputs will change). If the motors are enabled (no fault present) a rising edge will disable them.
- "RequestReference": A rising edge will start the reference procedure for all joints.
- "Play": The first rising edge will start the currently loaded robot program, the second will stop (not pause) it.
- "Pause": The rising edge will pause the program. If a program is paused it will be continued on another rising edge.
- "Alt-Start": Two-button-control: Depending on the current state successive rising edges will: reset errors, enable motors, reference (if necessary) and start the loaded program.
- "Alt-Stop": Two-button-control: Depending on the current state successive rising edges will: Pause the program, stop it, then reset errors (which disables the motors).
- "Shutdown": Turns the embedded control computer or PC down.
- "Start platform mission": Start the selected platform mission.
Outputs from the Robot to the Master:
- "NoFault": This output is high when the robot is in "No Error" state
- "Fault": The opposite of No Fault
- "Program Running": This output is high when the robot program is running.
- "Program Not Running": The opposite of Program Running
- "Robot Is Referenced": This output is high when all joints are referenced.
- "Platform Mission Running": This output is high when the platform mission is running.
Configuration
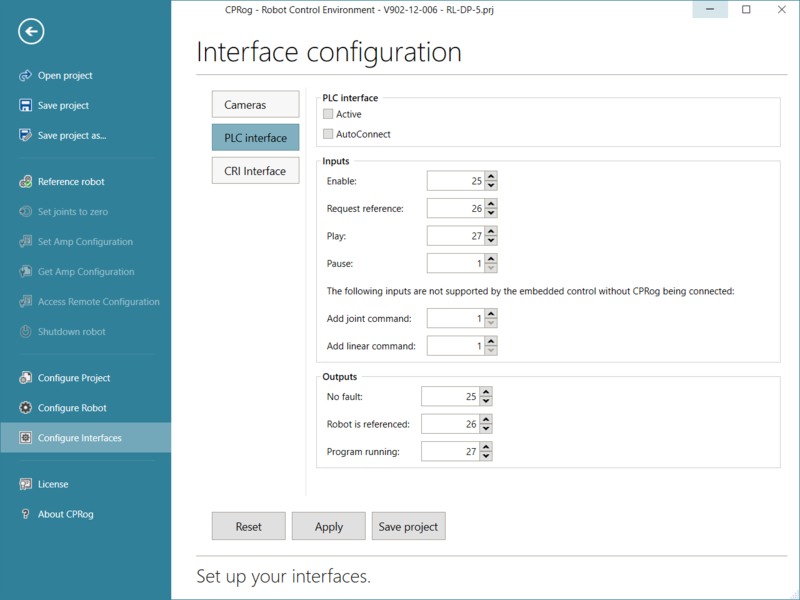
The PLC interface can be set up graphically using CPRog/iRC or by manually changing the configuration files.
- Start CPRog/iRC and load the correct project for your robot
- If your robot is using an embedded control (TinyCtrl) connect it
- Click File -> Configure Interfaces -> PLC interface
- Enable the PLC interface by checking 'Active'
- Enter the DIn numbers according to your wiring. Unused functions can be disabled by setting a DIn number that does not exist, e.g. 1.
- Click "Save project". The PLC interface should be enabled immediately.
