Upgrade Phytec Module to Embedded Control
Appearance
This guide explains how to upgrade the Phytec Module to an Embedded Control. Please note that not all Phytec based boards can be updated to an Embedded Control.
Upgrade Kit
To upgrade your robot, please send a picture of your control to support@cpr-robots.com so we can check if an upgrade is possible. Afterwards you will get an offer for the upgrade kit you need. The Upgrade Kit includes the Embedded Control and necessary connecting parts.
Updating to Embedded Control
- Switch off the control unit and disconnect the main plug.
- Unplug the handheld control unit (if present) from the corresponding connection of the adapter in the control cabinet.
- Disconnect all wires coming out of the Phytec board. In detail:
- All wires in the ‘CAN’ connector of the support module (3 x grey, 1x white)
- Two grey wires in the double-deck terminal for connecting the hand-held pendant station
- One black wire in the GND terminal block
- Disconnect all wires of the adapter for the hand-held pendant station. In detail:
- The brown and orange wires in the double-decker terminal block
- The red wire in the 24V terminal block
- The black wire in the GND terminal block
- Remove the Phytec board, the empty double-decker terminal block and the display adapter from the control cabinet.
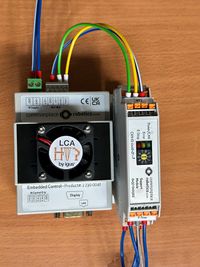
- Click the new Embedded Control into the top-hat rail of the control cabinet. The side with the pre-wired connectors should be on the same side as the ‘CAN’ connector of the support module.

- Connect the wires of the ‘OUT-BUS’ connector of the embedded control to the ‘CAN’ connector of the support module as follows:
- Dark blue/white in position 2 (GND)
- Yellow in position 3 (CAN-L)
- Green in position 4 (CAN-H)
- Position 1 of the connector remains empty, the other connectors of the support module remain connected as they are
- Connect the wires of the ‘IN-SUPPLY’ connector of the Embedded Control as follows:
- Dark blue into the 24V terminal block
- Dark blue/white to the GND terminal block
- Connect the handheld control unit (if available) directly to the Embedded Control at the ‘Display’ output
- Connect the Ethernet cable to the LAN connection of the Embedded Control.
Your robot should then start as usual.