Difference between revisions of "DCi quickstart guide"
From Wiki
| Line 23: | Line 23: | ||
=Reference= | =Reference= | ||
There is a whole section on referencing the robolink robots in this wiki. In short: | There is a whole section on referencing the robolink robots in this wiki. In short: | ||
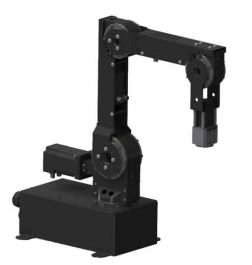
| − | #Move the robot close to its reference switch position: each axis has a metal pin in the joint that is used to sense the reference position. Since you are doing this step for the first time and the robot might still be "folded up" for shipping, | + | #Move the robot close to its reference switch position: each axis has a metal pin in the joint that is used to sense the reference position. Since you are doing this step for the first time and the robot might still be "folded up" for shipping, jog the joints until the robot is in this position |
| − | + | [[file:robolink_dci_referencing_position.png]] | |
| − | |||
| − | |||
Revision as of 18:09, 5 July 2018
CURRENTLY UNDER CONSTRUCTION
This guide is meant to serve as the initial instruction set to get you going with the DCi robot.
Never hotplug anything. Switch off the robot prior to making any connection.
Switch on and Move
- Once you have unpacked your DCi Robot, place it on a level surface, remove all zip-ties and packaging material from the robot arm. Make sure that there is sufficient free space around the robot to operate the arm.
- Connect the Teach Pendant (that is what we call the remote control with the display) to the rear of the robot and tighten the fixing screws of the connector.
- The robot requires a 24V 4A. A power supply is normally shipped with the DCi robot. Connect it to the back of the robot.
- Connect the power supply to the mains and switch on the robot at the back of the robot.
- The LEDs at the back of the robot will light up and the Teach Pendant will initialise.
- After 20s most of the green LEDs at the back of the robot should be blinking. This indicates that communication has been established to the stepper motor modules and the digital input/output module(s).
- If the red emergency stop button of the Teach Pendant is depressed, disengage it by rotating and pulling at the knob.
- Next to a status message, you should see two soft-buttons in the touch display: Reset and enable. Click Reset, followed by Enable to reset the robot and enable the motors.
- Now there should be a red message in the display saying that the robot is not referenced yet. We will ignore that for now and do the referencing later.
- Push the "Jog" Menu button at the top of the touch display.
- Using the joystick, you should now be able to jog the first, second and third axis to verify their function (slowly rotate the joystick left and right, up-down, left-right).
- Push A5 at the bottom of the screen to gain control of joint 4 and 5. Move it by rotating the joystick left and right, up-down.
Reference
There is a whole section on referencing the robolink robots in this wiki. In short:
- Move the robot close to its reference switch position: each axis has a metal pin in the joint that is used to sense the reference position. Since you are doing this step for the first time and the robot might still be "folded up" for shipping, jog the joints until the robot is in this position
