Difference between revisions of "Set up, testing of single joints"
| Line 42: | Line 42: | ||
If the robot with electronics has '''not''' been configured by CPR because the robot was bought separately from the control electronics, then the following steps have to be performed: | If the robot with electronics has '''not''' been configured by CPR because the robot was bought separately from the control electronics, then the following steps have to be performed: | ||
| − | |||
===Prepare the Cables=== | ===Prepare the Cables=== | ||
Revision as of 08:36, 12 May 2018
If you have ordered the robot including controller directly from CPR, the robot and its control electronics have been configured and tested. The following procedure described on this page does not need to be carried out.
If you have ordered the control electronics separately, it needs to be set up and configured to correctly control the joints of a robot.
Robot and controller configured by CPR
The procedure to commission the robot is shown below.
![]() Do not hot-plug! Always switch of the power supply and wait a few seconds before working on the connectors!
Do not hot-plug! Always switch of the power supply and wait a few seconds before working on the connectors!
In some cases screws in the joints 2, 3 or 4 have been removed to decrease packaging size. Re-assemble the robot with these screws.
Set up and check the controller:
- Connect/check that the emergency stop button is plugged into the E-Stop connector on the Support module
- Connect/check that the closed loop connector is plugged into the Ext-Relay connector on the Support module
- Connect/check that the PCAN-USB adapter is connected with the according cable to the CAN connector on the Support module
- Provide 24V power supply
- If the controller has been delivered with power supply just connect it to the 110/220V plug
- If you use an existing power supply, connect it to the control via the fuse. The supply should provide at least 5A at 24V
Now the green LEDs on the modules should be on.
- Install and start CPRog from the provided CD
- Load the correct project using the "Load Project" Button in the menu on the upper-left circle
- Press the "Connect" button. Now the green LEDs on the stepper and DIO modules should blink to show activity on the CAN bus
Connect the Joint Cables
Switch off the robot control electronics.
- Connect the joint cables to the stepper modules. The are labelled with the joint numbers, and also the function.
- Ensure that the connectors cannot be pulled out during robot operation by stress on the cables as hot-plugging the 'Motor' connectors during operation can damage the stepper motor control electronics.
- Switch on the power supply
- Start CPRog and press "Connect" and "Reset". Now the status in the left column should change to "Motors not enabled"
- Release the Emergency Stop and press "Enable". Now the status on the left changes to "No Error"
- Now you can jog the robot arm
- Proceed with referencing the robot (Referencing robolink) and programming the arm
Configure the control electronics for your robot
If the robot with electronics has not been configured by CPR because the robot was bought separately from the control electronics, then the following steps have to be performed:
Prepare the Cables
- Add the connectors provided by CPR to the motor, encoder and reference cables. This is shown in the robolink User Guide.
Test single Joints
- Set up the robot control and CPRog as described above
- Now every single joint should be tested using the ModuleCtrl software
 Again, avoid hot-plugging!
- Install the ModuleCtrl software as described here: Config Software ModuleCtrl.
- Connect the cables for one joint with the according stepper module
- Start ModuleCtrl, choose the correct CAN-ID: 0x10 for Joint1, 0x20 for Joint2, ... and press "Connect"
- Press "SetToZero", "Reset" and "Enable". Now you should be able to move the joint with the center dial.
Invert the Encoder Direction for Joint5
The Joint5 encoder is mounted in opposite direction then the other encoders in some robot models. When testing this results in an increasing motion of the joint 5 until the position lag error stops the operation. The stepper module has to be configured accordingly:
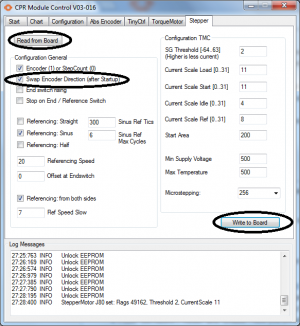
- Change to tab "Stepper" and click on "Read from Board".
- Toggle the "Swap encoder direction" box. Changing this parameter takes effect only after a cold-start of the contorl electronics.
- Save the parameter to the board: Click on "Write to Board" in the bottom right corner of the window.
- Switch off the control electronics and close the ModuleCtrl Software, wait a few seconds and switch on the control electronics.
To verify the correct operation of the encoder direction of axis 5
- start the robot, and the ModuleCtrl software
- select CAN ID 0x50 and click "Connect", "Reset" and "Enable"
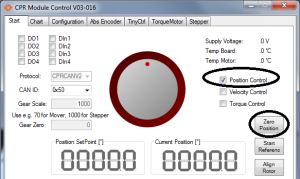
- Ensure that ModuleCtrl is in "Position" mode, so that the encoder information is used. In "Velocity" mode, the encoder info is disregarded, hence you would not be able to find out whether the correct encoder direction has been chosen.
- Zero the current encoder position by clicking on "Zero Position".
- Move the big dial in the middle of the window a small amount. Axis 5 should move to the new position. Once the motor has stopped moving, you should see that the values in the fields "Position SetPoint" and "Current Position" are identical.
If the cables of the robot are not marked
In some cases the cables might not be marked, then it is difficult to find the right cables for each joint. Some hints:
- Connect 3 cables to the joint 1 module
- Start the control and the ModuleCtrl software, connect to the right joint
- Rotate all robot joints a little bit with your hand. You will see a motion in the range of some tics on the right display when you move the one that is connected.
- Place a screw drivers head or another piece of metal before the reference switches. The connected one will light up.
- When enabling the motor the joint will probably speed up into one direction due to the missing encoder signals, so place your hand on the emergency stop button.
- This way it should be possible with some trial and error to find the right combination of motor, encoder and reference cables.
For questions or comments please get in contact with us: info(at)cpr-robots.com

