Changing Speed Limits
Depending on your application you may want to decrease or increase the speed limits of your robot. This can be done in the robot configuration file. This article is a step-by-step guide for changing the speed limits.
Important: Do this only if you really need to. The standard values are set for reliability. Increasing the speeds can increase the risk for motor stalls due to higher torque requirements and torque loss from higher motor speeds. The maximum reachable speed also depends on your application, e.g. the load that your robot moves and the resistance of the robots axes (e.g. when gantry axes are not parallel enough). Increasing the speed can also lead to a less smooth motion.
Changing the speed limits requires the following steps:
- Load the robot configuration from the robot
- Open the file in a basic text editor
- Change the limits
- Write the configuration back to the robot
- Restart the robot control
If you are using iRC / CPRog V13 you will also need to change a second copy of the file on your PC, otherwise the simulation and program editor will use the wrong speeds. V14 always loads the configuration from your robot on connect, so it is not necessary there.
Real robot / Embedded Control (V13 and newer)
Follow these steps if your robot connects via a network cable or via WiFi.
Load the robot configuration file

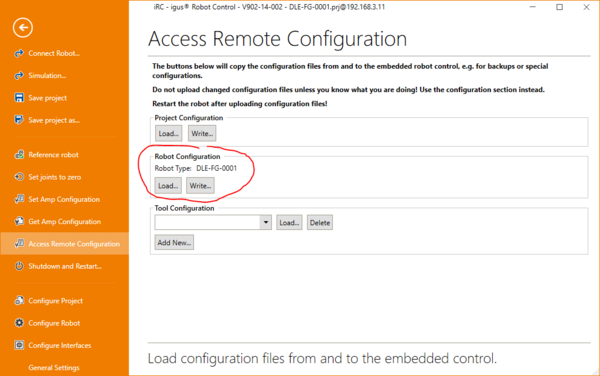
Connect iRC / CPRog to your robot. Then click "File" -> "Access Remote Configuration" -> "Robot Configuration" -> "Load...". Save the file somewhere where you will find it.
Open the configuration file
Open the configuration file in a basic text editor, e.g. Notepad. To do this do a right click on the file, then click "Edit". If some other program appears that is no text editor close it and do another right click on the file, then click "Open with" and select Notepad.
Edit the maximum velocities
General velocity limits
Find the following lines in the configuration file:
 <JointVelocities A1="300" A2="400" A3="300" A4="120" />
 <JointAccelerations A1="3000" A2="3000" A3="3000" A4="400.0" A5="100.0" A6="100.0" />
 <JointAccelerationIncs A1="9000" A2="9000" A3="9000" A4="1200.0" A5="100.0" A6="100.0" />
 <CartVelocities VelTrans="400" VelOri="180"/>
 <CartAccelerations AccLin="3000" AccLinInc="9000" AccOri="900" AccOriInc="3000" />

 <JointVelocities2 A1="400" A2="500" A3="300" A4="120" />
 <JointAccelerations2 A1="3000" A2="3000" A3="3000" A4="400.0" A5="100.0" A6="100.0" />
 <JointAccelerationIncs2 A1="9000" A2="9000" A3="9000" A4="1200.0" A5="100.0" A6="100.0" />
 <CartVelocities2 VelTrans="500" VelOri="180"/>
 <CartAccelerations2 AccLin="3000" AccLinInc="9000" AccOri="900" AccOriInc="3000" />
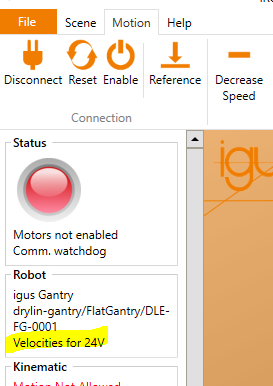
Note that the second block resembles the first but the XML tags (the names on the left side of the lines) ends with "2". The first block without a number is for 24V controls, the block ending with "2" is for 48V controls which usually are able to move faster. Not all robots exist in both variants.

To find out which block applies to your robot check the left side bar in iRC. See the screen shot on the right side of this article.
- JointVelocities: Speeds for joint motion in degrees/s (rotational axes) or mm/s (linear axes).
- JointAccelerations: Accelerations for joint motion in degrees/s² or mm/s². The exact value is usually not too important, try big steps.
- JointAccelerationIncs: Jerk for joint motion in degrees/s³ or mm/s³. Increase in very big steps.
- CartVelocities: VelTrans defines the XYZ motion speed in cartesian mode in mm/s, VelOri is the ABC rotation speed in cartesian mode in degrees/s
- CartAccelerations: These are the corresponding acceleration and jerk values for cartesian motion.
Jog velocities
The following line defines the speeds for jog motion (i.e. the buttons below the 3D view, the gamepad and the teach pendant).
<Velocities JogCart="200.0" JogOri="45" JogJoint="0.4" />
- JogCart defines the motion XYZ speed in cartesian mode in mm/s.
- JogOri is the ABC rotation speed in cartesian mode in degrees/s.
- JogJoint is a percent value for joint mode, each axis may move up to this percentage of their maximum speed defined in JointVelocities. In this example 0.4 means 40%.
Write the file to the robot control
After changing the configuration save the file (use a different name so that you can use the original as a backup in case anything goes wrong!).
Then return to iRC's Access Remote Configuration menu ("File" -> "Access Remote Configuration"). In the robot configuration section click "Write..." and select the changed file. iRC will confirm that the file is uplodaded.
Restart the robot control to apply the changes
The changes become active after a restart. You can do this by turning off the robot or by clicking "File" -> "Shutdown and Restart..." -> "Restart Software" in iRC. The latter approach is a bit faster.
Wait ca. 30s, then try to connect iRC. Test your new configuration, first with a low velocity override (the +/- buttons above the 3D view) so that the robot does not move unexpectedly fast if you typed a too high value. Keep the e-stop reachable.
Simulation and Robots via USB-to-CAN (V13)
The older versions of iRC / CPRog do not synchronize the configuration files on connect. Therefore you will need to also change the configuration file on your PC that is used for the simulation. V14 also contains configuration files to simulate standard robots, you can change those in the same way.
First open the installation directory of iRC / CPRog in the file browser. The standard path for iRC is C:\iRC-igusRobotControl, for CPRog C:\CPRog. In there open the folder "Data" -> "Robots" -> the category of your robot -> the type of your robot. In that folder you will find a file with the same name as the folder, ending with .xml. Open this in the text editor and change it as explained above.
Note that an update of iRC / CPRog restores the original values, so consider keeping a backup copy of your changed file.