Difference between revisions of "2D Camera Integration"
m (Added deprecation warning) |
(Article rewritten for the integrated camera interface) |
||
| Line 1: | Line 1: | ||
| − | + | Cameras can be used by CPRog/iRC and the embedded control to pick objects at varying positions. This article explains the hardware and software set up for an IFM O2D camera. | |
| − | + | Currently supported are the following cameras that do the image processing and object recognition internally: | |
| + | * IFM O2D | ||
| + | * [[Remote_Variable_Access#Protocol|Cameras that can send TCP/IP messages of the same format as the O2D]] | ||
| − | + | Not supported are cameras that do not provide object information, e.g. video cameras or webcams. To use such cameras the user needs to implement their own processing application that [[Remote_Variable_Access|sends the data via the CRI or camera interface]] and run it on a separate device (in case of a robot with embedded control). | |
| − | |||
| − | |||
| − | + | The entire process is shown in this video (German): [https://youtu.be/OJcislaY9Ek Tutorial Kameraintegration] | |
| − | |||
| − | |||
| − | |||
| − | |||
| − | |||
| − | |||
| − | |||
| − | |||
| − | |||
| − | |||
| − | |||
| − | |||
| − | |||
| − | |||
| − | |||
=Safety= | =Safety= | ||
* [[file:Caution.png|20px]] Caution! Personal safety has to be ensured during operation. | * [[file:Caution.png|20px]] Caution! Personal safety has to be ensured during operation. | ||
| Line 32: | Line 17: | ||
=Mechanical and electrical setup= | =Mechanical and electrical setup= | ||
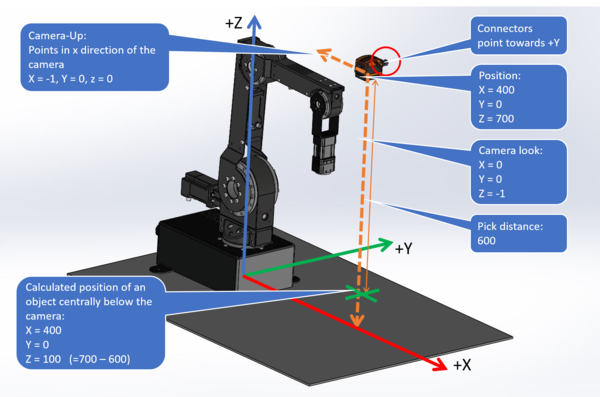
[[file:IFM_camera_vectors.png|thumb|right|600px|Preferred camera mounting position]] | [[file:IFM_camera_vectors.png|thumb|right|600px|Preferred camera mounting position]] | ||
| − | The camera has to be mounted at ample height above the | + | The camera has to be mounted at ample height above the workpieces. Care has to be taken to avoid any collisions. Please refer to the documentation of the camera for acceptance cone and minimum distance. |
| − | *The camera should be mounted parallel to the coordinate axes of the robot | + | *The camera should be mounted parallel to the coordinate axes of the robot if possible. - That means either overhead, in front or from the side. This will simplify calibration significantly (see image on the right). |
*Power requirements: Connect the leads of the black power cable to a 24V supply: | *Power requirements: Connect the leads of the black power cable to a 24V supply: | ||
** blue lead: GND | ** blue lead: GND | ||
| − | ** brown lead: 24V (please verify the pin configuration with the | + | ** brown lead: 24V (please verify the pin configuration with the documentation of the camera). |
<br clear=all> | <br clear=all> | ||
| Line 45: | Line 30: | ||
*Plug ethernet cable into camera and PC. | *Plug ethernet cable into camera and PC. | ||
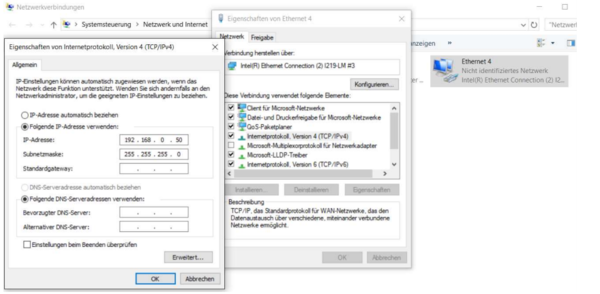
*Set IP of PC to a free IP in the <code>192.168.0/24</code> range, e.g. <code>192.168.0.50</code> | *Set IP of PC to a free IP in the <code>192.168.0/24</code> range, e.g. <code>192.168.0.50</code> | ||
| − | *Camera IP is factory configured for <code>192.168.0.49</code>. So do not use this particular IP on your computer | + | *Camera IP is factory configured for <code>192.168.0.49</code>. So do not use this particular IP on your computer. |
<br clear=all> | <br clear=all> | ||
| Line 51: | Line 36: | ||
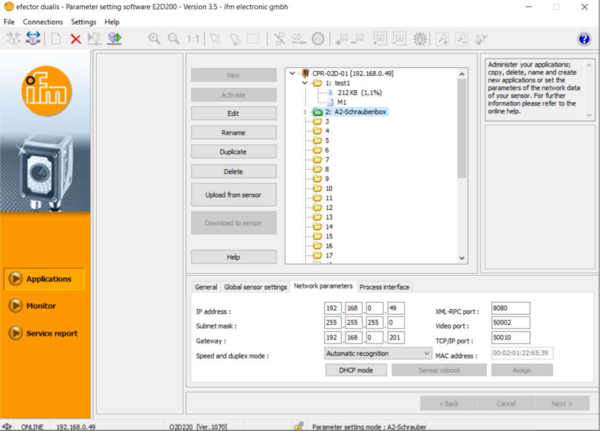
[[file:IFM_camera_configuration_E2D200.png|thumb|right|600px|IFM Camera TCP/IP setings]] | [[file:IFM_camera_configuration_E2D200.png|thumb|right|600px|IFM Camera TCP/IP setings]] | ||
| − | The image processing is done entirely in camera. To recognize a | + | The image processing is done entirely in camera. To recognize a workpiece an "application" has to be set up containing the model of the workpiece. The camera is configured using the IFM Software efector dualis E2D200. |
| + | |||
| + | Communication with the robot control requires the following settings: | ||
| + | * TCP/IP settings: | ||
| + | ** Without embedded control: Keep the factory defaul IP address or use one of your choice in the network of your computer. | ||
| + | ** With Raspberry Pi-based embedded control: 192.168.3.49 or a different address in that same network but not 192.168.3.11. Since this ethernet port is used for connecting the computer you may need to use a network switch so you can connect both. | ||
| + | ** With Phytec-based embedded control: | ||
| + | *** Ethernet port 2 (recommended): 192.168.4.49 or a different address in that same network but not 192.168.4.11. | ||
| + | *** Ethernet port 1: See Raspberry Pi-based control. | ||
| + | After changing the IP address you may need to update the IP address of your computer as described in section [[2D_Camera_Integration#PC Network Configuration|PC Network Configuration]] otherwise you may not be able to connect to the camera. | ||
| − | |||
| − | |||
* An [[media:TestConfig_IFM-O2D_CPR.zip|example camera configuration]] can be downloaded here - it is set up to recognize a 2 Euro coin in our lighting conditions and camera set up. (Your mileage may vary. This file is provided to make sure that parameters, such as IP and result output are correct.) To get it to actually recognize a coin, read the IFM documentation. The file has to be unzipped before loading it by right clicking on an unused folder in the "Applications" dialogue and selecting "Download to Sensor" followed by right clicking on the same folder and selecting "Activate". Not that the IP configuration of the camera is also updated (to the defaultsettings) when doing that (192.168.0.49). | * An [[media:TestConfig_IFM-O2D_CPR.zip|example camera configuration]] can be downloaded here - it is set up to recognize a 2 Euro coin in our lighting conditions and camera set up. (Your mileage may vary. This file is provided to make sure that parameters, such as IP and result output are correct.) To get it to actually recognize a coin, read the IFM documentation. The file has to be unzipped before loading it by right clicking on an unused folder in the "Applications" dialogue and selecting "Download to Sensor" followed by right clicking on the same folder and selecting "Activate". Not that the IP configuration of the camera is also updated (to the defaultsettings) when doing that (192.168.0.49). | ||
| − | |||
| − | |||
<br clear=all> | <br clear=all> | ||
[[file:IFM_camera_configuration_E2D200_1.png|thumb|right|600px|IFM Protocol Version settings]] | [[file:IFM_camera_configuration_E2D200_1.png|thumb|right|600px|IFM Protocol Version settings]] | ||
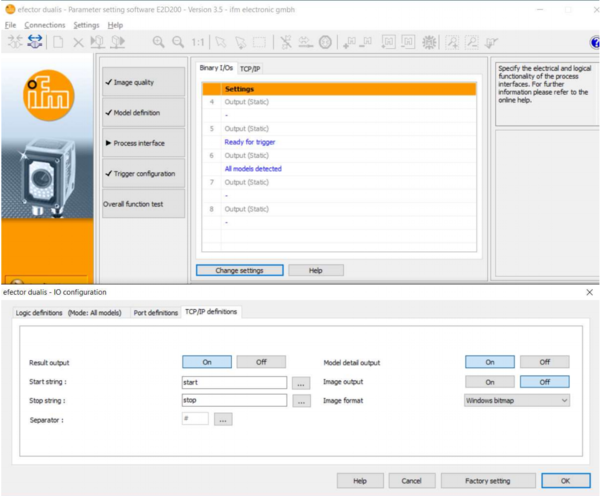
| − | *The Protocol Version | + | *The Protocol Version must be V2 and the output format ASCII. |
<br clear=all> | <br clear=all> | ||
| Line 70: | Line 60: | ||
** "Result Output" to On | ** "Result Output" to On | ||
** "Model Detail Output" to On | ** "Model Detail Output" to On | ||
| − | + | ** "Start sring" to "start" | |
| + | ** "Stop string" to "stop" | ||
| + | ** "Separator" tp "#" | ||
| + | ** "Image output" may be On or Off. Set this to "On" if you want to be able to see the camera's image in CPRog/iRC, otherwise "Off" is recommended | ||
| + | ** "Image format" to "Windows bitmap" | ||
<br clear=all> | <br clear=all> | ||
| − | + | Make sure that the camera recognizes your object reliably enough before proceeding to the next step. | |
| − | |||
| − | |||
| − | |||
| − | |||
| − | + | =Setting up the robot control= | |
| − | + | ==Calibration and configuration with CPRog/iRC== | |
| + | [[File:Camera_Configuration.jpeg|thumb|right|600px|Configuration in CPRog/iRC]] | ||
| + | [[file:IFM_camera_vectors.png|thumb|right|600px|Measure the parameters off your camera setup]] | ||
| − | + | Now that the camera is ready to deliver object model and position information the robot control needs to be set up to connect to the camera and calculate the object/pick positions in 3D space. | |
| − | |||
| − | + | * Start CPRog/iRC and connect it to the robot if you are using one with embedded control. | |
| − | + | * Open the camera configuration: File -> Configure Interfaces -> Cameras | |
| + | * Add a new camera of type "IFM O2D". | ||
| − | + | The configuration area should look similar to the screenshot on the right. | |
| − | + | ===General settings=== | |
| + | These settings refer to the connection to the camera and enable it to be used in a robot program. | ||
| − | + | * '''Enabled''': This enables the camera in CPRog/iRC. If it is disabled the values from the simulation section will be used. Keep this disabled if you are using an embedded control, otherwise CPRog/iRC might prevent the embedded control from receiving data from the camera. | |
| − | + | * '''Image enabled''': If an image is received it will be shown in the camera status section in CPRog/iRC. | |
| − | + | * '''Name''': This name identifies the camera in the robot program. | |
| + | * '''Description''': An optional description, this setting has no effect. | ||
| + | * '''IP address''': IP address of the camera as set up earlier in this article. | ||
| + | * '''Port''': Port number of the camera, by default 50010. | ||
| − | + | ===Geometry settings=== | |
| − | + | These settings are used to calibrate the camera so that the correct positions in 3D space are calculated from the received data. Refer to the image on the right on how to measure these values. | |
| − | |||
| − | |||
| − | |||
| − | |||
| − | |||
| − | |||
| − | |||
| − | |||
| − | |||
| − | |||
| − | |||
| − | |||
| − | |||
| − | == | ||
| − | |||
| − | |||
| − | |||
| − | |||
| − | |||
| − | |||
| − | |||
| − | |||
| − | |||
| − | |||
| − | |||
| − | |||
| + | * '''Scaling''': The camera outputs the object position results in pixels and hands it over to the plugin. To calculate the robot target position the pixel values have to be multiplied with the scaling factor. The scaling factor is dependent on the distance between camera and the surface the camera looks at (see next section). | ||
* '''Origin''': The position of the camera in the robot coordinate system (x/y/z value). | * '''Origin''': The position of the camera in the robot coordinate system (x/y/z value). | ||
| + | * '''Look Vector''': The viewing direction of the camera. In the image the camera looks down in negative Z direction. | ||
| + | * '''Up Vector''': This vector defines the rotation of the camera around the target axis, i.e. top and bottom in a 2D image. | ||
| + | * '''Pick Distance''': Is the distance between the top of the workpiece and the camera. | ||
| − | + | ===Simulation settings=== | |
| − | * ''' | + | The simulation settings are used when the camera is not enabled in CPRog/iRC. Simulation is not available in the embedded control. These values simulate the information received from the camera before transformation to 3D space, therefore the simulated object position will differ from these values. |
| − | * ''' | + | * '''Sim X''' and '''Sim Y''': Simulated object position in camera image space (usually 0-640 and 0-480) |
| + | * '''Sim A''': object orientation | ||
| + | * '''Model class''' | ||
| − | + | Click "Save Project" to save the changes in CPRog/iRC and the embedded control (if connected). Test the settings carefully, preferably in simulation first, with a low override. Watch whether the robot collides with the ground surface or object. | |
| + | <br clear=all> | ||
| − | + | ==Camera status== | |
| − | + | [[File:IRC_CameraStatus.PNG|thumb|500px|The status area shows the camera status and object information]] | |
| − | + | Once configured the status area in CPRog/iRC will show the status of the camera and the position and model class of the recognized object. If the camera image is enabled it will be shown there as well. | |
| + | <br clear=all> | ||
| − | == | + | ==Using the camera in a robot program== |
| − | + | [[file:Example_IFM_Camera.png|thumb|600px|Example Program]] | |
| − | |||
| − | |||
| − | |||
| − | |||
| − | |||
| − | |||
| − | |||
| − | |||
| − | |||
| − | [[file: | ||
| − | |||
| − | |||
| − | |||
| − | |||
| − | |||
| − | |||
| − | |||
| − | |||
| − | |||
| − | |||
| − | |||
| − | |||
| − | |||
| − | |||
| − | |||
| − | |||
| − | |||
| − | |||
| − | |||
| − | |||
| − | |||
| − | |||
| − | |||
| − | |||
| − | |||
| − | |||
| − | |||
| − | |||
| − | |||
| − | |||
| − | |||
| − | |||
| − | |||
| − | |||
| − | |||
| − | |||
| − | |||
| − | |||
| − | |||
| − | |||
| − | |||
| − | |||
| − | + | The screenshot shows how the camera can be used in a robot program. | |
| − | + | # Declare two variables using the store command: A position variable for the object position and a number variable for the model class. | |
| + | # Use the Camera command to copy object information into the variables. This command does not wait, if no new information is available it will return the previous values again. If no object is recognized the model class will be -1, the position value must not be used in that case. | ||
| + | # Use an If statement to check whether the model class is greater than -1. | ||
| + | # In that case you may proceed to use the object position. In CPRog/iRC and TinyCtrl earlier than V12 only the cartesian object position is available, you can not use joint commands to move to the object. Joint commands in V12 and later may be faster than linear commands. | ||
| − | + | [[File:Example_IFM_Camera_NoOrientation.PNG|thumb|600px|Overwrite the object orientation if the robot moves slowly]] | |
| − | + | '''Attention 1:''' Your robot might moves to the object slower than usual, especially if your robot has no orientation axis (e.g. gantries and deltas). To fix this you can overwrite the orientation values of the target position variable. The approach show in the screenshot should work in all cases. If you are using a gantry, delta or SCARA without orientation axis / 4th axis you can use the constant A,B,C values shown in the Infocenter instead of using the additional CurrentPosition variable. | |
| − | |||
| − | |||
| − | + | '''Attention 2:''' In case of robot arms: Linear commands may not be able to move to your object position from each position. Make sure your object can be reached reliably or use a joint command to move close to the gripping position and use a linear command for the last cm if necessary. | |
| − | |||
| − | |||
| − | |||
| − | |||
| − | |||
| + | [[media:CameraExample.zip|You can download the example program here.]] | ||
| − | [[Category:CPRog]][[Category: | + | [[Category:CPRog]][[Category:TinyCtrl]] |
Revision as of 16:32, 9 June 2021
Cameras can be used by CPRog/iRC and the embedded control to pick objects at varying positions. This article explains the hardware and software set up for an IFM O2D camera.
Currently supported are the following cameras that do the image processing and object recognition internally:
Not supported are cameras that do not provide object information, e.g. video cameras or webcams. To use such cameras the user needs to implement their own processing application that sends the data via the CRI or camera interface and run it on a separate device (in case of a robot with embedded control).
The entire process is shown in this video (German): Tutorial Kameraintegration
Safety
 Caution! Personal safety has to be ensured during operation.
 This is especially relevant during configuration and set up of the camera application. All motion has to be carried out at slow speeds.
 The operator has to be ready to stop the robot
 It is recommended that all programs are tested in the simulation prior to moving the robot.
Mechanical and electrical setup
The camera has to be mounted at ample height above the workpieces. Care has to be taken to avoid any collisions. Please refer to the documentation of the camera for acceptance cone and minimum distance.
- The camera should be mounted parallel to the coordinate axes of the robot if possible. - That means either overhead, in front or from the side. This will simplify calibration significantly (see image on the right).
- Power requirements: Connect the leads of the black power cable to a 24V supply:
- blue lead: GND
- brown lead: 24V (please verify the pin configuration with the documentation of the camera).
PC Network Configuration
- Plug ethernet cable into camera and PC.
- Set IP of PC to a free IP in the
192.168.0/24range, e.g.192.168.0.50 - Camera IP is factory configured for
192.168.0.49. So do not use this particular IP on your computer.
Camera configuration
The image processing is done entirely in camera. To recognize a workpiece an "application" has to be set up containing the model of the workpiece. The camera is configured using the IFM Software efector dualis E2D200.
Communication with the robot control requires the following settings:
- TCP/IP settings:
- Without embedded control: Keep the factory defaul IP address or use one of your choice in the network of your computer.
- With Raspberry Pi-based embedded control: 192.168.3.49 or a different address in that same network but not 192.168.3.11. Since this ethernet port is used for connecting the computer you may need to use a network switch so you can connect both.
- With Phytec-based embedded control:
- Ethernet port 2 (recommended): 192.168.4.49 or a different address in that same network but not 192.168.4.11.
- Ethernet port 1: See Raspberry Pi-based control.
After changing the IP address you may need to update the IP address of your computer as described in section PC Network Configuration otherwise you may not be able to connect to the camera.
- An example camera configuration can be downloaded here - it is set up to recognize a 2 Euro coin in our lighting conditions and camera set up. (Your mileage may vary. This file is provided to make sure that parameters, such as IP and result output are correct.) To get it to actually recognize a coin, read the IFM documentation. The file has to be unzipped before loading it by right clicking on an unused folder in the "Applications" dialogue and selecting "Download to Sensor" followed by right clicking on the same folder and selecting "Activate". Not that the IP configuration of the camera is also updated (to the defaultsettings) when doing that (192.168.0.49).
- The Protocol Version must be V2 and the output format ASCII.
- Select you newly created project and click on the edit button on the LEFT.
- Then click on "Process Interface" and "Change Settings". The window "IO configuration" appears.
- In the "TCP/IP settings" set
- "Result Output" to On
- "Model Detail Output" to On
- "Start sring" to "start"
- "Stop string" to "stop"
- "Separator" tp "#"
- "Image output" may be On or Off. Set this to "On" if you want to be able to see the camera's image in CPRog/iRC, otherwise "Off" is recommended
- "Image format" to "Windows bitmap"
Make sure that the camera recognizes your object reliably enough before proceeding to the next step.
Setting up the robot control
Calibration and configuration with CPRog/iRC
Now that the camera is ready to deliver object model and position information the robot control needs to be set up to connect to the camera and calculate the object/pick positions in 3D space.
- Start CPRog/iRC and connect it to the robot if you are using one with embedded control.
- Open the camera configuration: File -> Configure Interfaces -> Cameras
- Add a new camera of type "IFM O2D".
The configuration area should look similar to the screenshot on the right.
General settings
These settings refer to the connection to the camera and enable it to be used in a robot program.
- Enabled: This enables the camera in CPRog/iRC. If it is disabled the values from the simulation section will be used. Keep this disabled if you are using an embedded control, otherwise CPRog/iRC might prevent the embedded control from receiving data from the camera.
- Image enabled: If an image is received it will be shown in the camera status section in CPRog/iRC.
- Name: This name identifies the camera in the robot program.
- Description: An optional description, this setting has no effect.
- IP address: IP address of the camera as set up earlier in this article.
- Port: Port number of the camera, by default 50010.
Geometry settings
These settings are used to calibrate the camera so that the correct positions in 3D space are calculated from the received data. Refer to the image on the right on how to measure these values.
- Scaling: The camera outputs the object position results in pixels and hands it over to the plugin. To calculate the robot target position the pixel values have to be multiplied with the scaling factor. The scaling factor is dependent on the distance between camera and the surface the camera looks at (see next section).
- Origin: The position of the camera in the robot coordinate system (x/y/z value).
- Look Vector: The viewing direction of the camera. In the image the camera looks down in negative Z direction.
- Up Vector: This vector defines the rotation of the camera around the target axis, i.e. top and bottom in a 2D image.
- Pick Distance: Is the distance between the top of the workpiece and the camera.
Simulation settings
The simulation settings are used when the camera is not enabled in CPRog/iRC. Simulation is not available in the embedded control. These values simulate the information received from the camera before transformation to 3D space, therefore the simulated object position will differ from these values.
- Sim X and Sim Y: Simulated object position in camera image space (usually 0-640 and 0-480)
- Sim A: object orientation
- Model class
Click "Save Project" to save the changes in CPRog/iRC and the embedded control (if connected). Test the settings carefully, preferably in simulation first, with a low override. Watch whether the robot collides with the ground surface or object.
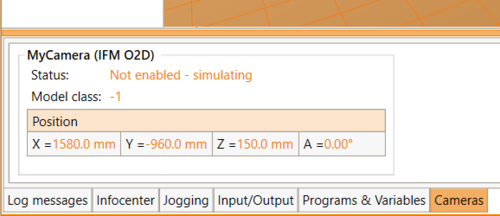
Camera status
Once configured the status area in CPRog/iRC will show the status of the camera and the position and model class of the recognized object. If the camera image is enabled it will be shown there as well.
Using the camera in a robot program
The screenshot shows how the camera can be used in a robot program.
- Declare two variables using the store command: A position variable for the object position and a number variable for the model class.
- Use the Camera command to copy object information into the variables. This command does not wait, if no new information is available it will return the previous values again. If no object is recognized the model class will be -1, the position value must not be used in that case.
- Use an If statement to check whether the model class is greater than -1.
- In that case you may proceed to use the object position. In CPRog/iRC and TinyCtrl earlier than V12 only the cartesian object position is available, you can not use joint commands to move to the object. Joint commands in V12 and later may be faster than linear commands.
Attention 1: Your robot might moves to the object slower than usual, especially if your robot has no orientation axis (e.g. gantries and deltas). To fix this you can overwrite the orientation values of the target position variable. The approach show in the screenshot should work in all cases. If you are using a gantry, delta or SCARA without orientation axis / 4th axis you can use the constant A,B,C values shown in the Infocenter instead of using the additional CurrentPosition variable.
Attention 2: In case of robot arms: Linear commands may not be able to move to your object position from each position. Make sure your object can be reached reliably or use a joint command to move close to the gripping position and use a linear command for the last cm if necessary.
