Tool Configuration
Robot tools, like grippers, are defined in separate configuration files that can be easily swapped or shared between different projects. This article explains how to configure a robot to use a tool and how to change an existing tool or create a new one.
See also category Tool.
Changing Tools
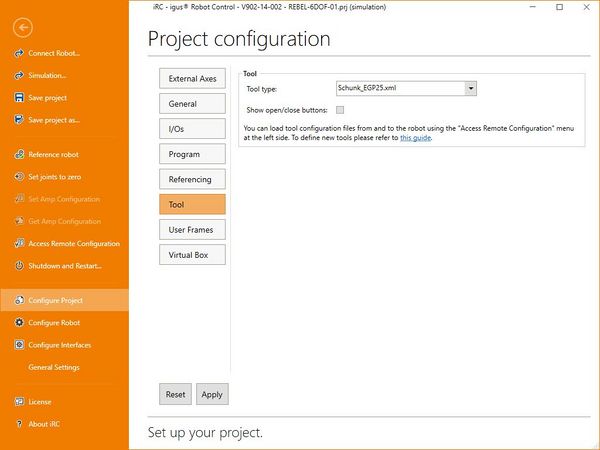
To change the tool first connect CPRog/iRC to your robot. Then open the Tool section in the project configuration area. Select the tool type, then click "Save project" to apply and save the change to the current project. A restart of the robot control may be necessary.
This only works if the tool configuration is present on the connected robot control. Read the following section if it is not.
Transferring a Tool Configuration to the Embedded Control
If the tool can not be applied to the embedded control the tool configuration file is most likely missing there. To fix this find the configuration file in the data directory of CPRog/iRC, e.g.:
C:\CPRog\Data\Tools\<ToolName>.xml
Copy this file to the embedded control:
- via CPRog/iRC: Click "File" -> "Access Remote Configuration" -> "Tool Configuration" -> "Add New..."
- using a SFTP client: /home/root/TinyCtrl/Data/Tools/<ToolName>.xml
Configuring a Tool
Tools are configured in XML files (find the paths as described in the previous section). 3d graphics files can be used to visualize the tool in CPRog/iRC. To create a new tool simply copy and change an existing tool configuration file. Once your changes are done transfer the configuration file to the robot control.
Basic configuration
The structure of the tool configuration looks like this:
<?xml version="1.0" encoding="utf-8"?>
<Tool>
  <INFO NAME="ParallelGripper" AUTHOR="Christian Meyer" />
  <OFFSET OffsetX="0" OffsetY="0" OffsetZ="105" OffsetA="0.0" OffsetB="0" OffsetC="0.0" />
  <CAD FileStandard="FestoPG_open.obj" FileActive="FestoPG_closed.obj" FlipMesh="True" />
  <KINEMATIC Motion="Digital" MotionVel="10" />
  <INTERFACE Protocol="digital" ChannelOpenClose="11" ChannelEnable="12" />
</Tool>
- INFO defines information that don't affect functionality
- OFFSET defines the offset (position and rotation) of the tool center point, relative to the tool base
- CAD defines optional 3D mesh files for visualization
- KINEMATIC defines how the tool motion is calculated
- INTERFACE specifies whether the tool is controlled by a digital output or a motor controller
Kinematic
If Motion is set to Digital the visualization only shows if the tool is open or closed (or active/inactive).
If you need more control over the motion you can use the linear kinematic. This allows to specify how the gripper claw moves.
<KINEMATIC Motion="Linear" MotionMin="10" MotionMax="100.0" MotionVel="15.0" MotionOffsetX="0.0" MotionOffsetY="0.0" MotionOffsetZ="0.0"/>
Interface
Choose Protocol="digital" if your tool is controlled by digital outputs. Enter the DOut channel numbers at ChannelOpenClose and ChannelEnable.
Alternatively you can use Protocol="bus", if the tool is controlled like a joint, e.g. if it is connected to a motor module. You can configure the following parameters:
- BusID: CAN bus ID
- GearScale: Gear ratio
- GearZero: Zero position offset
- MaxCurrent, CurrentScale, CurrentZero: Current settings
- Bus: Bus type (currently not relevant for CAN-based connections)
- Torque: Currently not relevant for CAN-based connections
- ComplianceSlope: Currently not relevant for CAN-based connections
Visualization
You may specify two 3D mesh files for visualization in the CAD-tag, FileStandard and FileActive.
If Kinematic is set to "digital" FileStandard is used for the open state and FileActive for the closed state. If Kinematic is set to "linear" FileActive will be animated as specified in "Kinematic".
