PLC Interface
Video Tutorial https://youtu.be/A5bhbdmGZXU
It is often necessary to integrate the robot into a production system. One component is normally the master that orchestrates the other devices. With this interface the CPR robot can be controlled by a master, e.g. a PLC. The PLC sets digital inputs to reference, reset and enable the robot, and it can start/stop the loaded program. The robot provides information on its current status using digital outputs.
Availability: This feature is available since CPRog V902-09-011 (August 2017). Please see Software Updates.
Available Channels
Inputs from the Master to the Robot:
- "Enable": The first rising edge will reset all errors, the second rising edge (min. 1 s later) will enable the robot. When the robot is enable, that means it is in "No Error" state, it will set the "NoFault" output high.
- "RequestReference": A rising edge will start the reference procedure for all joints. The joint sequence (which joint at first, ...) is defined below. After referencing the robot is in an error state, reset and enable have to be done.
- "Play": The first rising edge will start the currently loaded robot program, the second will stop (not pause) it. The program that is loaded at startup is also defined in the project file in line 5, or it is set automatically when saving the project.
- "Pause": The rising edge will pause the program. This is implemented in CPRog/iRC V902-11-024 and TinyCtrl V980-11-102 or newer.
Outputs from the Robot to the Master:
- "NoFault": This output is high when the robot is in "No Error" state
- "ProgramRunning": This output is high when the robot program is running.
- "RobotIsReferenced": This output is high when all joints are referenced.
Configuration
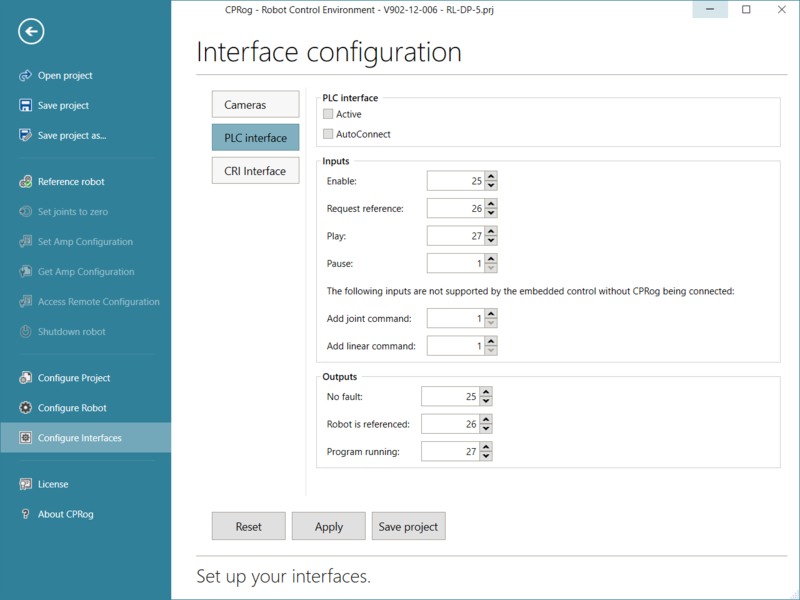
The PLC interface can be set up graphically using CPRog/iRC or by manually changing the configuration files.
Via CPRog/iRC
- Start CPRog/iRC and load the correct project for your robot
- If your robot is using an embedded control (TinyCtrl) connect it
- Click File -> Configure Interfaces -> PLC interface
- Enable the PLC interface by checking 'Active'
- Enter the DIn numbers according to your wiring. Unused functions can be disabled by setting a DIn number that does not exist, e.g. 1.
- Click "Save project". The PLC interface should be enabled immediately.
Via configuration files
The configuration of the PLC Interface is done in the project file, found in c:\CPRog\Data\Projects\
Ensure changes are made to the correct project file, i.e. the one that you are currently using in CPRog.
- For the robolink D arms (including the DCi) please use DIO numbers 21 to 27 reduced by one, these are the seven inputs and seven outputs of the first DIO module of the
DIN-Rail robot control electronics. Digital Output 26 means the last output of DIO module 1.
- Note that early robolink DCi robots were shipped with only 4 digital outputs instead of 7, which is the standard for the DIN-rail system, hence digital output numbers 24, 25, 26 in the code snippet below would have to be 21, 22, 23 respectively. This would be the second, third and fourth digital output of the DIO module of the DCi (see DCi_quickstart_guide#DIO_Module_PinOut).
The first line activates the PLC interface and tells the software to automatically connect to the CAN bus.
The second line defines the which input channels to use, the third line defines the output input channels.
The last line defines the sequence of referencing the joints.
<PLCInterface Active="true" AutoConnect="true"/>
<PLCInterfaceIn EnableNumber="24" RequestReferenceNumber="25" PlayNumber="26" />
<PLCInterfaceOut NoFaultNumber="25"  ProgramRunningNumber="26"  RobotIsReferenced="24"/>
<PLCInterfaceRefSequence JointToRef0="2" JointToRef1="1" JointToRef2="3" JointToRef3="4" JointToRef4="0" JointToRef5="-1" JointToRef6="-1" JointToRef7="-1" JointToRef8="-1"/>
Activate PLC interface in TinyCtrl
This is only relevant, if you are using a DCi robot or an external linux system mounted on the DIN rail to control the robot.
In addition to the steps described above you'll need to gain access to the linux PC to make the same changes on that system: FTP_and_putty_Access.
The file to be edited is located here:
/home/root/TinyCtrl/Data/Projects/EmbeddedCtrl.prj
Note 2019-07-17: Currently TinyCtrl is case sensitive for boolean statements, such as true and false. CPRog is not. When transferring any settings from a CPRog .prj or .xml file to EmbeddedCtrl.prj or any other xml file that has to be read by TinyCtrl on the embedded Linux Module, it is important to ensure that true and false are not capitalized.
- TinyCtrl will accept true and false
- CPRog will accept true and false but also True and False
