Difference between revisions of "CRI Ethernet Interface"
m (Link to Python library) |
|||
| (22 intermediate revisions by 3 users not shown) | |||
| Line 1: | Line 1: | ||
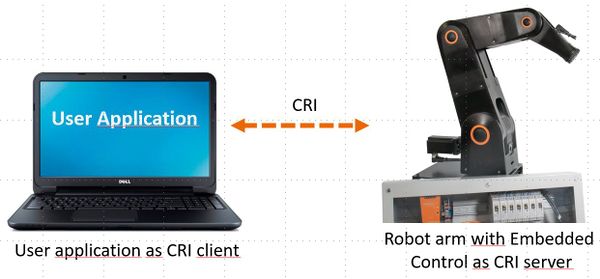
| − | The CRI interface allows remote applications to connect to a | + | The CRI ethernet interface allows remote applications to connect to a robot controller: iRC, CPRog or the embedded control. |
| − | [[File: | + | [[File:CRI-robolink.JPG|600px|CRI-Interface]] |
'''The remote application can request the following operations:''' | '''The remote application can request the following operations:''' | ||
* Jog the robot arm in joint space or cartesian space (base or tool coordinate system xyzabc) | * Jog the robot arm in joint space or cartesian space (base or tool coordinate system xyzabc) | ||
* Send commands: joint motion, linear motion, digital outputs, ... | * Send commands: joint motion, linear motion, digital outputs, ... | ||
| + | * Change variables | ||
* Start and stop programs. These can be stored programs or the commands just send. | * Start and stop programs. These can be stored programs or the commands just send. | ||
==Requirements== | ==Requirements== | ||
| − | * CPRog version V902- | + | * Using this interface requires programming experience in the client-server area. |
| + | * iRC / CPRog version V902-11-011 or higher | ||
| + | * Embedded Control with TinyCtrl version V980-11-087 or higher | ||
| + | * Updates can be found here: [[Software Updates]] | ||
| − | ==Documentation and | + | ==Documentation and Examples== |
| − | * | + | * Video with short explanation: [https://www.youtube.com/watch?v=cxzvMmma97Q YouTube Video] |
| − | * | + | * Documentation: |
| − | + | ** [[Media:CPR_RobotInterfaceCRI_V17.pdf|CRI V17 (since iRC/CPRog V14)]] | |
| − | + | ** [[Media:CPR_RobotInterfaceCRI.pdf|CRI V16 (until iRC/CPRog V13)]] | |
| − | + | ** [[CRI Client Structure]] - basic guide for any programming language | |
| − | * | + | ** [[Transferring Robot Programs via CRI]] - advanced guide on how to send program files to the robot |
| − | * | + | * Example code: |
| − | + | ** [https://github.com/CommonplaceRobotics/CRI-DemoClient CRI demo client] including source code in C# | |
| − | + | ** [[:File:Python_Minimal_Example.zip|Minimal example in Python]] | |
| − | + | ** [https://github.com/CommonplaceRobotics/CRI-Python-Lib/ Python library] | |
| − | * [[ | ||
| − | |||
| − | |||
| − | |||
| − | * | ||
| − | * | ||
| − | |||
| − | |||
| − | |||
| − | |||
| − | * | ||
| − | * | ||
| − | * | ||
| − | |||
| − | |||
| − | [[Category:Downloads]] | + | == Controlling a simulation via CRI == |
| + | The CRI can be tested in simulation with iRC or CPRog. No real robot is needed. | ||
| + | |||
| + | === Version 14 === | ||
| + | In version 14 the CRI is always available and does not need to be enabled. | ||
| + | |||
| + | Since the iRC user interface itself uses the CRI to control the simulation your CRI client will be connected passively first and must be set active before sending commands (see section "Multi client support" in the CRI documentation). This will make iRC a passive observer. Click "Reset" in iRC to make iRC become active again. | ||
| + | |||
| + | === Version 11-13 === | ||
| + | In CPRog/iRC V11-007 to V13 the simulation can be controlled via CRI after enabling it in the backstage menu: | ||
| + | * "File" -> "Configure Interfaces" -> "CRI Interface" | ||
| + | * "Datei" -> "Schnittstellenkonfiguration" -> "CRI-Schnittstelle" | ||
| + | |||
| + | Click "Start" to enable the CRI server in CPRog/iRC. The status text will show the IP address and port that is being used. For local testing use the "Force IP address" checkbox and enter "127.0.0.1" into the text box. | ||
| + | |||
| + | [[File:CRI_Server_Config.PNG|600px]] | ||
| + | |||
| + | Unlike V14 the user interface does not use the CRI and therefore does not become passive. | ||
| + | |||
| + | ==Further articles== | ||
| + | * [[Remote Variable Access|Accessing program variables via CRI]] | ||
| + | * [[Moving Robots via CRI]] | ||
| + | * [[CRI Client Structure]] | ||
| + | |||
| + | [[Category:Downloads]][[Category:CPRog]][[Category:TinyCtrl]] | ||
Latest revision as of 13:34, 1 August 2024
The CRI ethernet interface allows remote applications to connect to a robot controller: iRC, CPRog or the embedded control.
The remote application can request the following operations:
- Jog the robot arm in joint space or cartesian space (base or tool coordinate system xyzabc)
- Send commands: joint motion, linear motion, digital outputs, ...
- Change variables
- Start and stop programs. These can be stored programs or the commands just send.
Requirements
- Using this interface requires programming experience in the client-server area.
- iRC / CPRog version V902-11-011 or higher
- Embedded Control with TinyCtrl version V980-11-087 or higher
- Updates can be found here: Software Updates
Documentation and Examples
- Video with short explanation: YouTube Video
- Documentation:
- CRI V17 (since iRC/CPRog V14)
- CRI V16 (until iRC/CPRog V13)
- CRI Client Structure - basic guide for any programming language
- Transferring Robot Programs via CRI - advanced guide on how to send program files to the robot
- Example code:
- CRI demo client including source code in C#
- Minimal example in Python
- Python library
Controlling a simulation via CRI
The CRI can be tested in simulation with iRC or CPRog. No real robot is needed.
Version 14
In version 14 the CRI is always available and does not need to be enabled.
Since the iRC user interface itself uses the CRI to control the simulation your CRI client will be connected passively first and must be set active before sending commands (see section "Multi client support" in the CRI documentation). This will make iRC a passive observer. Click "Reset" in iRC to make iRC become active again.
Version 11-13
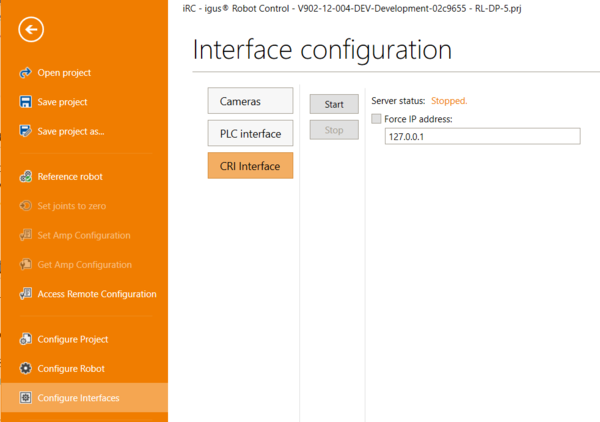
In CPRog/iRC V11-007 to V13 the simulation can be controlled via CRI after enabling it in the backstage menu:
- "File" -> "Configure Interfaces" -> "CRI Interface"
- "Datei" -> "Schnittstellenkonfiguration" -> "CRI-Schnittstelle"
Click "Start" to enable the CRI server in CPRog/iRC. The status text will show the IP address and port that is being used. For local testing use the "Force IP address" checkbox and enter "127.0.0.1" into the text box.
Unlike V14 the user interface does not use the CRI and therefore does not become passive.

