Starter Guide: Difference between revisions
mNo edit summary |
mNo edit summary |
||
| (7 intermediate revisions by the same user not shown) | |||
| Line 1: | Line 1: | ||
[[File:RBTX_Academy.png|400px|right|link=https://rbtx.de/en-GB/academy]] | |||
Please have a look at the [[Documentation | '''User Guide''']] for detailed information. | |||
You can find an online video introduction on the basics, as well as individual training in the [https://rbtx.de/en-GB/academy '''RBTX-Academy'''] | |||
<div style="clear:both;" /div> | |||
= Connecting = | = Connecting = | ||
[[File:HW_Connection.png|400px|right|link=]] | |||
Connect your PC to the robot, using a ethernet cable. You can find the ethernet port in the embedded controller, when using a IRC or in the base of the robot when using a ReBeL. | Connect your PC to the robot, using a ethernet cable. You can find the ethernet port in the embedded controller, when using a IRC or in the base of the robot when using a ReBeL. | ||
Make sure the IP-address of your PC-ethernet-port is [[Troubleshooting_Connection_Issues#Check_the_network_configuration_of_your_PC | set correctly]]. | Make sure the IP-address of your PC-ethernet-port is [[Troubleshooting_Connection_Issues#Check_the_network_configuration_of_your_PC | set correctly]]. | ||
[[File:IPv4_Settings.png|300px|right|link=]] | |||
Power up the robot and start the iRC Software and click on "File -> Connect To Robot -> New Connection -> Auto Connect". | Power up the robot and start the iRC Software and click on "File -> Connect To Robot -> New Connection -> Auto Connect". | ||
| Line 14: | Line 21: | ||
[[Troubleshooting Connection Issues]] | [[Troubleshooting Connection Issues]] | ||
[[File:ConnectToRobot.PNG|400px|link=]] | |||
<div style="clear:both;" /div> | |||
= Activating the Robot = | = Activating the Robot = | ||
[[File:Connect.PNG|300px|right|link=]] | |||
When first connecting to the robot, it will be deactivated. This means that the logic is already running, but the motors are not active yet. Press "Enable", to activate the motors and release the brakes (if there are any). | When first connecting to the robot, it will be deactivated. This means that the logic is already running, but the motors are not active yet. Press "Enable", to activate the motors and release the brakes (if there are any). | ||
| Line 21: | Line 35: | ||
If you can't activate the robot, please have a look at the [[Troubleshooting Identification]] guide. | If you can't activate the robot, please have a look at the [[Troubleshooting Identification]] guide. | ||
<div style="clear:both;" /div> | |||
= Moving the robot = | |||
You can now try to move single axes, by using the "Jogging" area. | |||
[[File:JoggingArea.PNG|350px|link=]] | |||
[[File:ReferencingMenu.PNG|300px|right|link=]] | |||
If you run into software limits, you first need to '''reference''' your robot (not needed for robots with absolute encoders like the ReBeL). | |||
Press the '''Reference''' Button at the top ("Start"-Tab) to go to the referencing area. Press "Reference all" to reference the axes. Keep an eye on the axes, to avoid collision! | |||
[[Troubleshooting Referencing Issues]] | |||
<div style="clear:both;" /div> | |||
= Programming = | |||
The key to automation is to create robot programs, that execute a specific order of pre-defined movements and commands. | |||
This can be done by using the [[Program Editor]]. | |||
Go to "Start -> Edit Program" to open the program editor. Here you will find everything you need to create a robot program. | |||
For your first test, try to add a joint movement by pressing "Motion -> Joint motion". This will create a motion command, to the current location. | |||
Then '''jog''' the robot elsewhere and add another joint motion command. Save the file and give a name of your choice. | |||
You can now go back to the main window and press "Start" at the top. The robot will now move to both positions in order. | |||
[[File:ProgramEditor.png|700px|link=]] | |||
For more examples and guides check out the [[Example Library]]. | |||
Latest revision as of 14:22, 19 May 2026

Please have a look at the User Guide for detailed information.
You can find an online video introduction on the basics, as well as individual training in the RBTX-Academy
Connecting
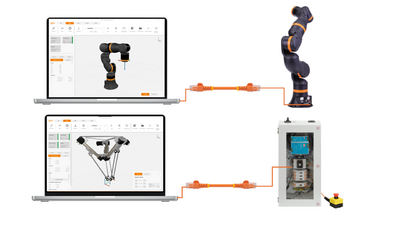
Connect your PC to the robot, using a ethernet cable. You can find the ethernet port in the embedded controller, when using a IRC or in the base of the robot when using a ReBeL.
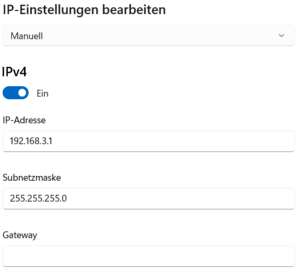
Make sure the IP-address of your PC-ethernet-port is set correctly.
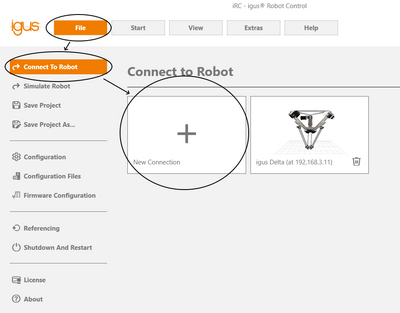
Power up the robot and start the iRC Software and click on "File -> Connect To Robot -> New Connection -> Auto Connect". You should now be connected to the robot. You can check the status in the main view.
Troubleshooting Connection Issues
Activating the Robot
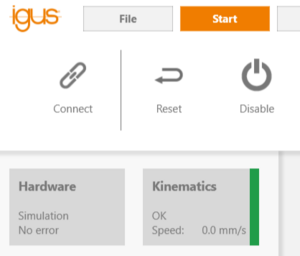
When first connecting to the robot, it will be deactivated. This means that the logic is already running, but the motors are not active yet. Press "Enable", to activate the motors and release the brakes (if there are any).
If everything is set up correctly, the status will switch to green.
If you can't activate the robot, please have a look at the Troubleshooting Identification guide.
Moving the robot
You can now try to move single axes, by using the "Jogging" area.
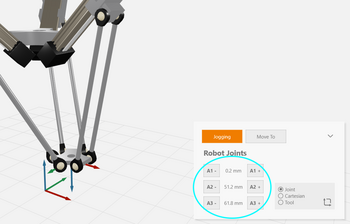
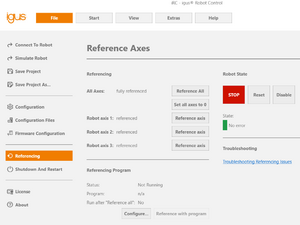
If you run into software limits, you first need to reference your robot (not needed for robots with absolute encoders like the ReBeL). Press the Reference Button at the top ("Start"-Tab) to go to the referencing area. Press "Reference all" to reference the axes. Keep an eye on the axes, to avoid collision!
Troubleshooting Referencing Issues
Programming
The key to automation is to create robot programs, that execute a specific order of pre-defined movements and commands. This can be done by using the Program Editor.
Go to "Start -> Edit Program" to open the program editor. Here you will find everything you need to create a robot program.
For your first test, try to add a joint movement by pressing "Motion -> Joint motion". This will create a motion command, to the current location. Then jog the robot elsewhere and add another joint motion command. Save the file and give a name of your choice. You can now go back to the main window and press "Start" at the top. The robot will now move to both positions in order.
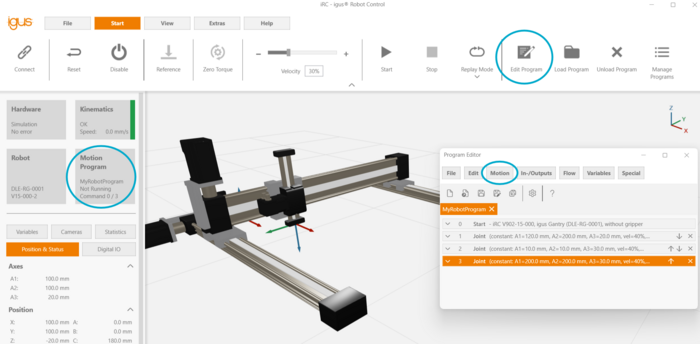
For more examples and guides check out the Example Library.